

Named Credentials in Salesforce provide a secure and efficient way to manage authentication for external systems. With the latest updates introduced in Winter ’23, Salesforce has revamped the Named Credentials setup. If you’re looking to integrate with external services using username and password authentication, this guide will walk you through the entire process in a simple and practical way.
Table of Contents
Setting Up Username and Password Authentication
With the new Named Credentials setup introduced in Winter ’23, the first step is to configure an External Credential before proceeding
Step 1: Create an External Credential
- Navigate to Setup in Salesforce and go to Named Credentials.
- Open the External Credentials subtab and click New.
- Provide the following details:
- Label: A meaningful name (e.g.,
ExternalAPIAuth). - Developer Name: Use
BasicAuthor a similar identifier. - Authentication Protocol: Select Custom.
- Label: A meaningful name (e.g.,
- Click Save

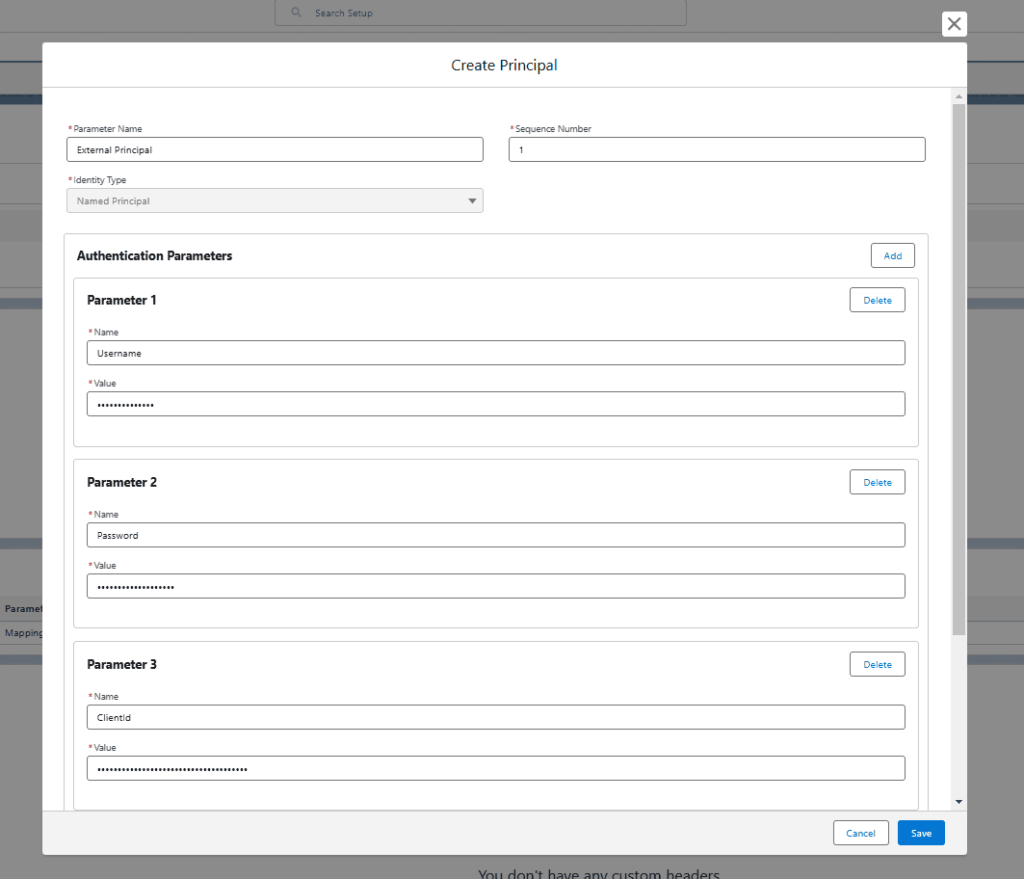
Step 2: Configure Permission Set Mapping
- In the External Credential record, click New under Principals.
- Specify the following:
- Identity Type: Select Named Principal (shared credentials for all users).
- Sequence Number: If applicable, set the priority if multiple mappings exist.
- Click Add to create Authentication Parameters for the username and password( optional: you can also add the Client ID and Client Secret as parameters) :
- Name:
Username, Value: Enter the username. - Name:
Password, Value: Enter the password. - Name: ClientId (optional), Value: Enter the Client ID.
- Name: Clientsecret (optional), Value: Enter the Client Secret.
- Name:
- Save the changes.
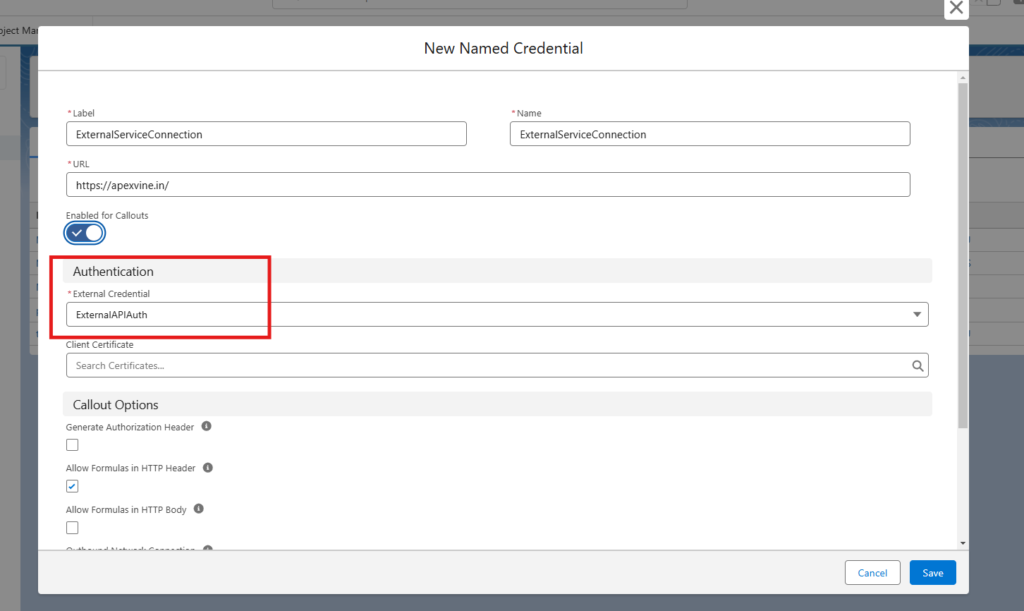
Step 3: Create a Named Credential
- Go back to the Named Credentials tab and click New.
- Configure the Named Credential:
- Label: Enter a descriptive name (e.g.,
ExternalServiceConnection). - Developer Name: Use a unique identifier.
- URL: Provide the endpoint URL of the external service.
- External Credential: Link it to the previously created External Credential.
- Label: Enter a descriptive name (e.g.,
- Uncheck Generate Authorization Header, as it is already handled by the Custom Header.
- Check Allow Formulas in HTTP Header to enable formula-based headers.
- Save the Named Credential
Notes: Remember to assign Named Credential access through Permission Sets to ensure proper user access.
Using Named Credentials in Apex
Named Credentials eliminate the need to hardcode authentication details in Apex. Here’s an example:
HttpRequest req = new HttpRequest();
req.setEndpoint('callout:ExternalServiceConnection/someEndpoint');
req.setMethod('POST');
req.setBody('grant_type=password'+ '&username='+'{!$Credential.ExternalAPIAuth.Username}' + '&password='+'{!$Credential.ExternalAPIAuth.Password}' +
'&clientid='+'{!$Credential.ExternalAPIAuth.ClientId}' +
'&clientid='+'{!$Credential.ExternalAPIAuth.ClientSecret}' };
Http http = new Http();
HttpResponse res = http.send(req);
System.debug(res.getBody());
Conclusion
Setting up Username and Password Authentication with the new Named Credentials feature provides a secure way to manage integrations. Although Basic Authentication may require a workaround, this method ensures seamless connectivity with external systems while adhering to best practices.
For more Salesforce tips and insights, explore ApexVine.in!